> ## Documentation Index
> Fetch the complete documentation index at: https://stackone-hub-docs-confluence-api-token-update.mintlify.site/llms.txt
> Use this file to discover all available pages before exploring further.

# Autodesk - IAM

> Follow these steps to connect Autodesk via the StackOne Hub successfully.

<Warning>
  Ensure you have Admin privileges for your Autodesk account.
</Warning>

If you've been directed to StackOne to integrate with Autodesk, the following steps will help you understand the process and any necessary actions to configure successful integration.

This guidance assumes that you are a Primary Admin or Secondary Admin within Autodesk.

## Enable Your Autodesk Developer Account

<Steps>
  <Step title="Gather Details">
    Following the instructions from the article [Autodesk Get Access to a BIM 360 Account](https://aps.autodesk.com), gather the following details:

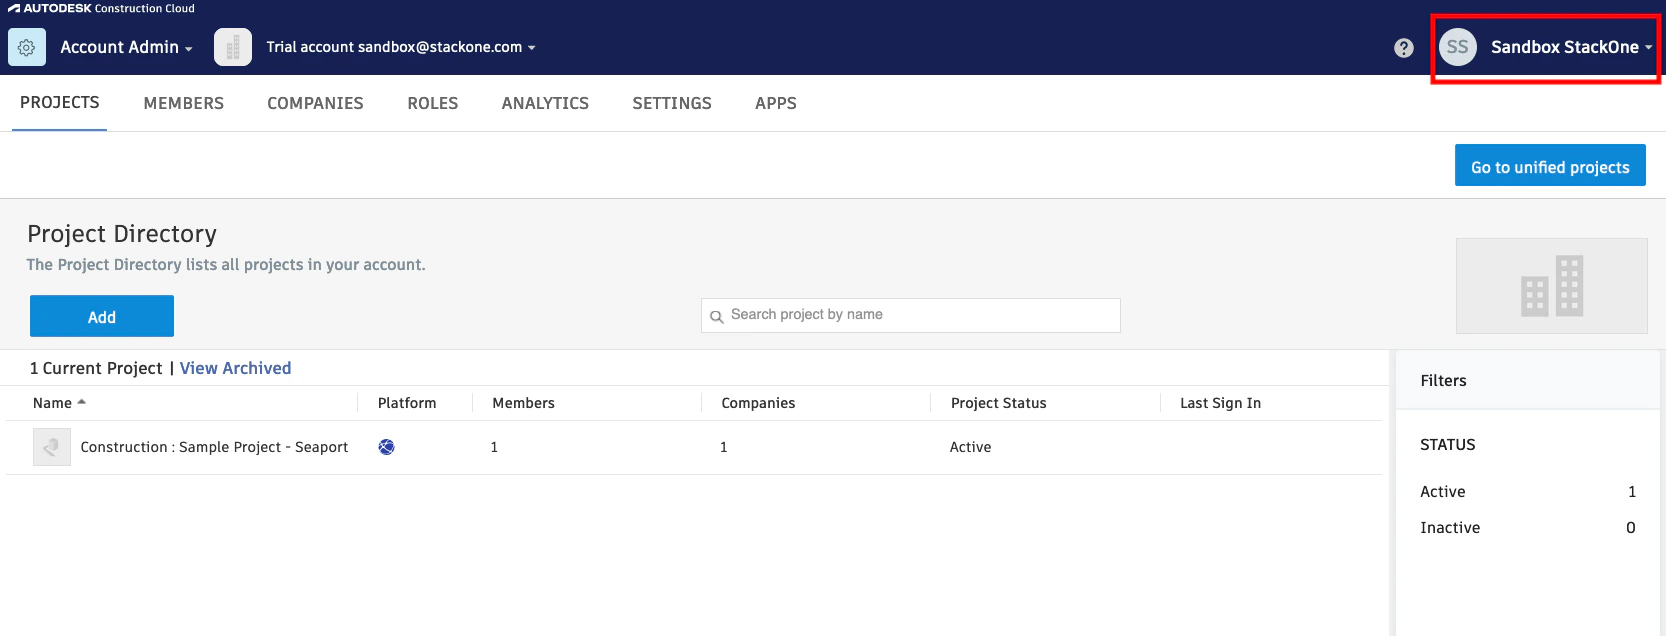
    * Account Name - located in the top-right when logged in to the B360 Admin
          <Frame>
            <img className="rounded-md" style={{ margin: '0 auto', border: '1px solid #efefef' }} alt="Applications" src="https://mintcdn.com/stackone-hub-docs-confluence-api-token-update/r1CxNaPqqmzcLh_k/images/autodesk/image1.png?fit=max&auto=format&n=r1CxNaPqqmzcLh_k&q=85&s=fc3086e054fd83b8962eeb290520ffa6" width="1666" height="636" data-path="images/autodesk/image1.png" />
          </Frame>

    * Account ID - located in the URL when logged in to the B360 Admin. This will also be used when connecting with StackOne.

      Example: `https://admin.b360.autodesk.com/admin/{{Account ID}}/projects`

    * Account Admin Email - this can be found on the User Management by User page
  </Step>

  <Step title="Request Activation">
    Send an email to [bim360appsactivations@autodesk.com](mailto:bim360appsactivations@autodesk.com) to request activation of your Developer Account. Include the Account Name, Account ID, and Account Admin Email from the step above.

    <ul>
      <li>This may take a few business days to complete. Autodesk will respond via email once complete.</li>
    </ul>
  </Step>
</Steps>

## Create Your Autodesk Application

<Steps>
  <Step title="Access Applications">
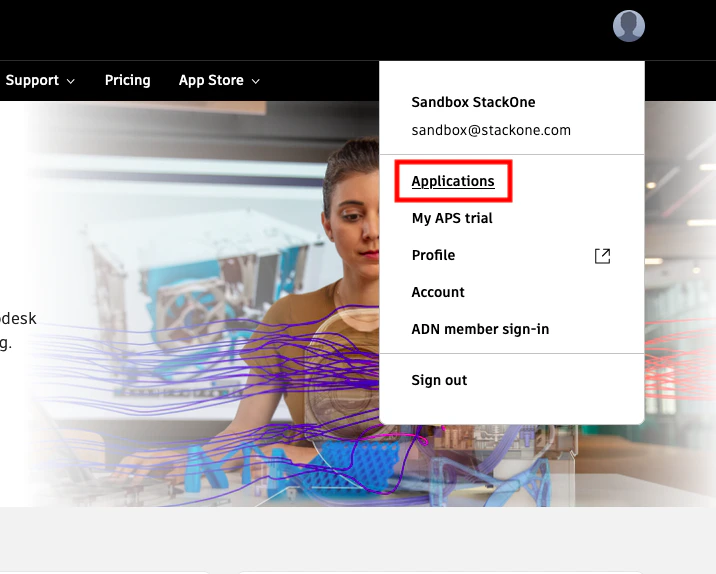
    In your Autodesk Platform, click your profile icon in the top-right, then click [Applications](https://aps.autodesk.com).
    <Frame>
      <img className="rounded-md" style={{ margin: '0 auto', border: '1px solid #efefef' }} alt="Applications" src="https://mintcdn.com/stackone-hub-docs-confluence-api-token-update/r1CxNaPqqmzcLh_k/images/autodesk/image2.png?fit=max&auto=format&n=r1CxNaPqqmzcLh_k&q=85&s=0a34b0b145525ed9d6ac7dc733f74a00" width="716" height="574" data-path="images/autodesk/image2.png" />
    </Frame>
  </Step>

  <Step title="Create Application">
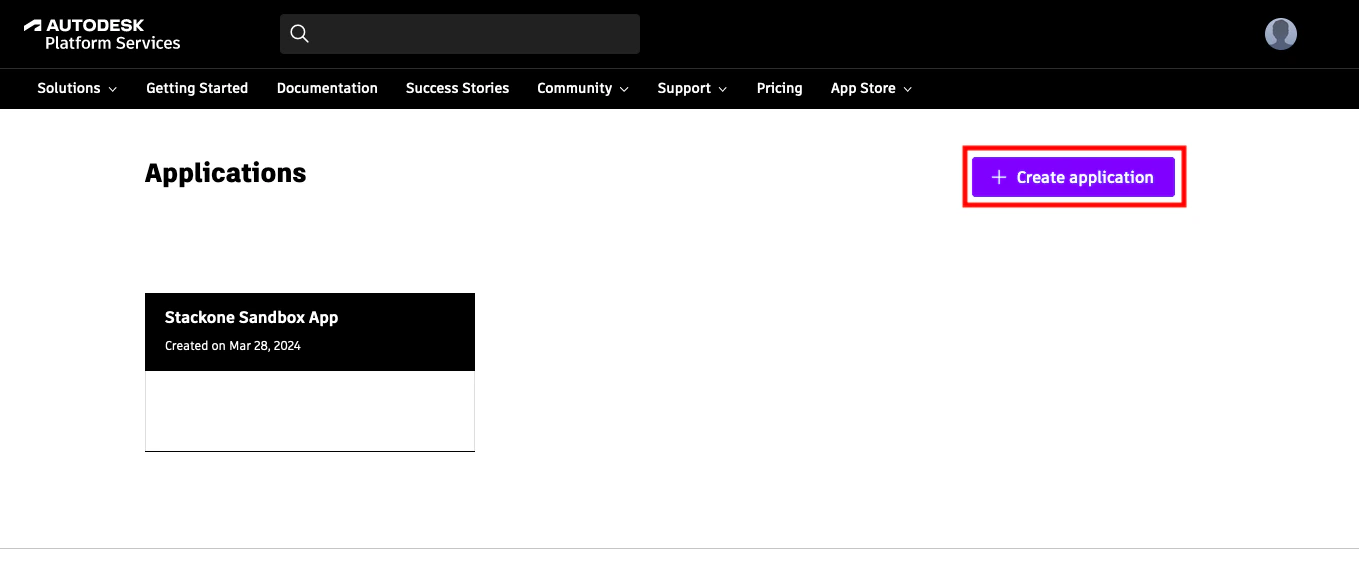
    Click the + Create Application button.
    <Frame>
      <img className="rounded-md" style={{ margin: '0 auto', border: '1px solid #efefef' }} alt="Create Application" src="https://mintcdn.com/stackone-hub-docs-confluence-api-token-update/r1CxNaPqqmzcLh_k/images/autodesk/image3.png?fit=max&auto=format&n=r1CxNaPqqmzcLh_k&q=85&s=9ea8b07d54d858d299bc43df80a159f3" width="1359" height="566" data-path="images/autodesk/image3.png" />
    </Frame>
  </Step>

  <Step title="Enter Application Details">
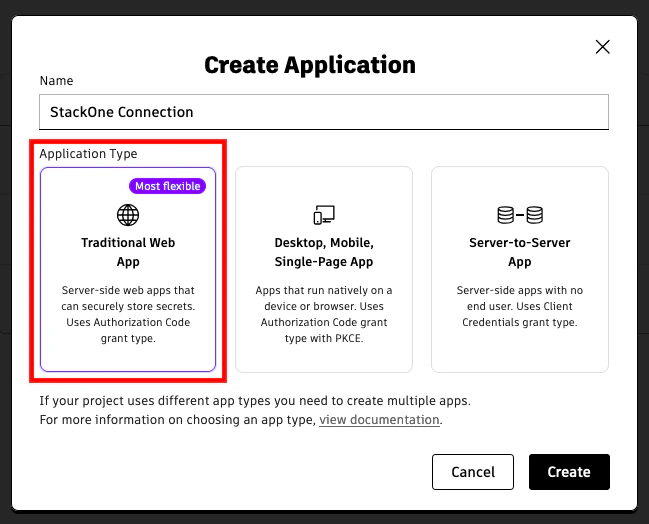
    Under Create Application, enter a Name for the new app, and select Traditional Web App. Click the Create button to continue.
    <Frame>
      <img className="rounded-md" style={{ margin: '0 auto', border: '1px solid #efefef' }} alt="Enter Application Details" src="https://mintcdn.com/stackone-hub-docs-confluence-api-token-update/r1CxNaPqqmzcLh_k/images/autodesk/image4.png?fit=max&auto=format&n=r1CxNaPqqmzcLh_k&q=85&s=af66ae4d40c004df8c9f3f44236fac16" width="649" height="524" data-path="images/autodesk/image4.png" />
    </Frame>
  </Step>

  <Step title="Copy Credentials">
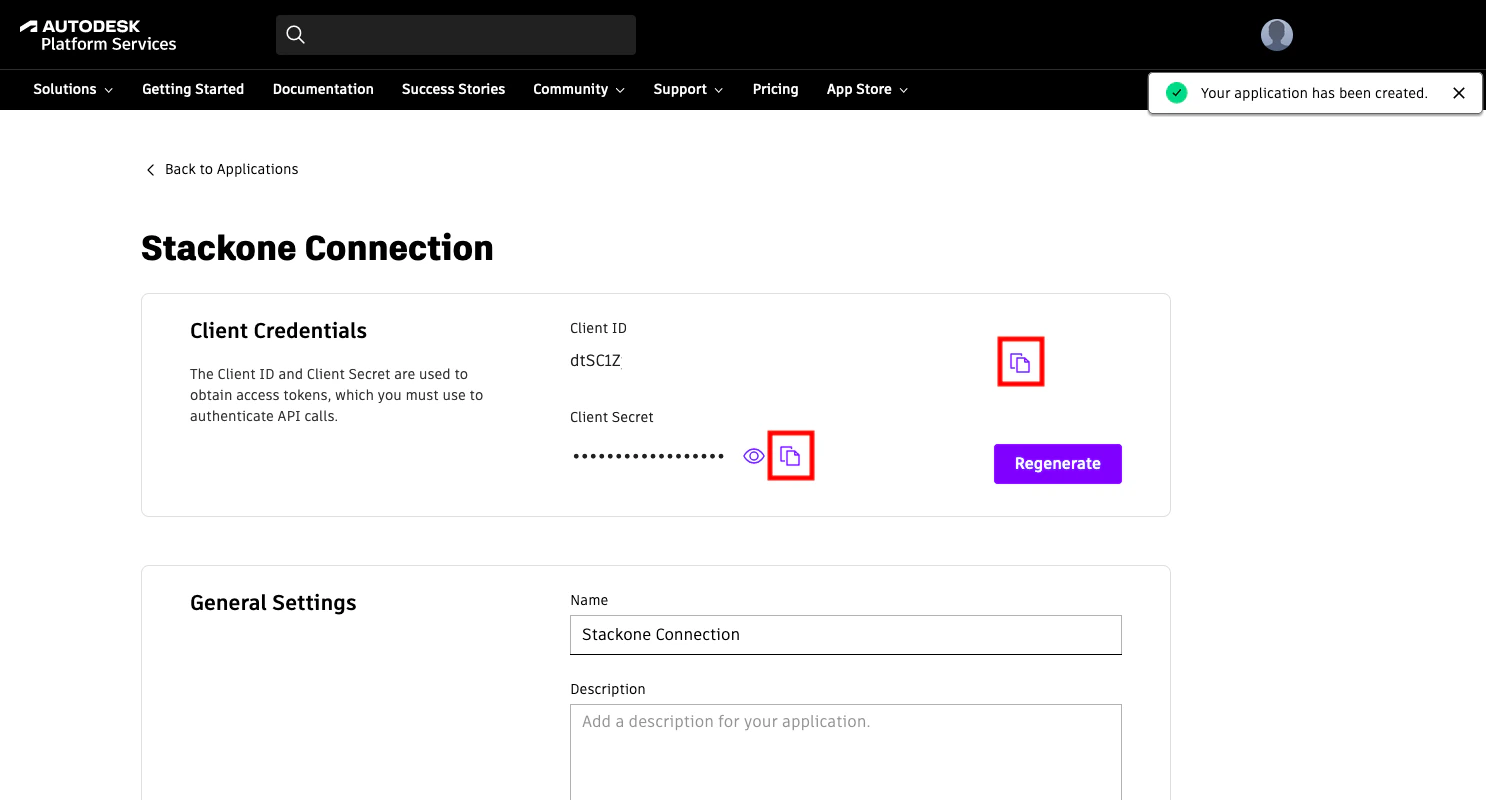
    Copy your displayed Client ID and Client Secret and store them safely to use in the following steps.
    <Frame>
      <img className="rounded-md" style={{ margin: '0 auto', border: '1px solid #efefef' }} alt="Copy Credentials" src="https://mintcdn.com/stackone-hub-docs-confluence-api-token-update/r1CxNaPqqmzcLh_k/images/autodesk/image5.png?fit=max&auto=format&n=r1CxNaPqqmzcLh_k&q=85&s=a6fecba07df83a053d031e1946b8198f" width="1486" height="800" data-path="images/autodesk/image5.png" />
    </Frame>
  </Step>

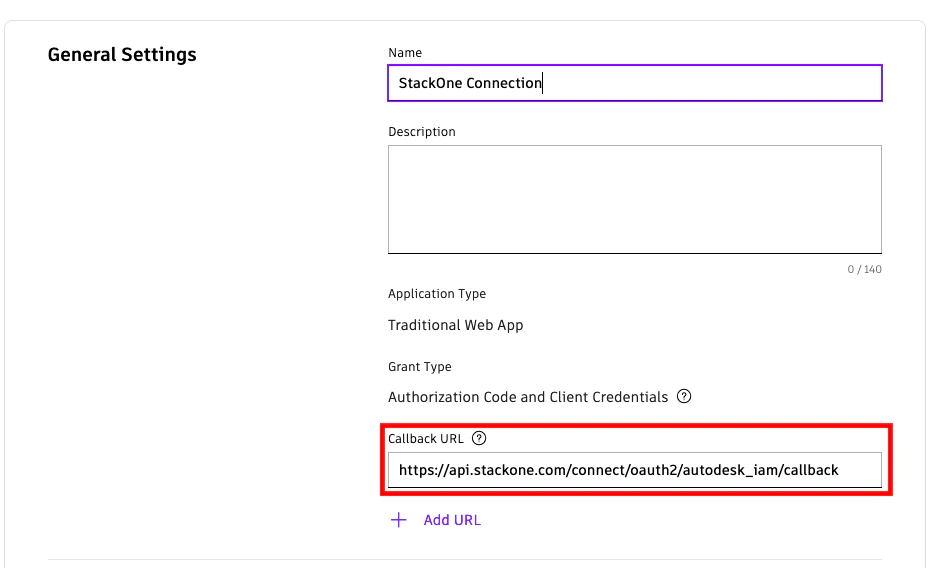
  <Step title="Set Callback URL">
    Under General Settings, enter the following as the Callback URL: `https://api.stackone.com/connect/oauth2/autodesk_iam/callback`
    <Frame>
      <img className="rounded-md" style={{ margin: '0 auto', border: '1px solid #efefef' }} alt="Set Callback URL" src="https://mintcdn.com/stackone-hub-docs-confluence-api-token-update/r1CxNaPqqmzcLh_k/images/autodesk/image13.png?fit=max&auto=format&n=r1CxNaPqqmzcLh_k&q=85&s=f887f5e4a2b8ea83a291b1940d4abf2a" width="939" height="568" data-path="images/autodesk/image13.png" />
    </Frame>
  </Step>

  <Step title="Set API Access">
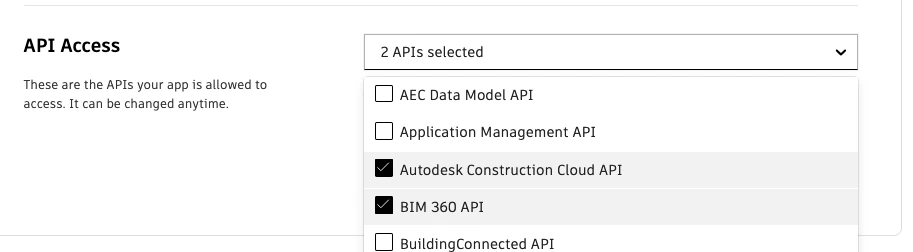
    Under API Access, select the following two APIs required for this integration:

    <ul>
      <li>Autodesk Construction Cloud API</li>
      <li>BIM 360 API</li>
    </ul>

    <Frame>
      <img className="rounded-md" style={{ margin: '0 auto', border: '1px solid #efefef' }} alt="Set API Access" src="https://mintcdn.com/stackone-hub-docs-confluence-api-token-update/r1CxNaPqqmzcLh_k/images/autodesk/image14.png?fit=max&auto=format&n=r1CxNaPqqmzcLh_k&q=85&s=7700f80c61c05705ec6c4e754a24affa" width="913" height="252" data-path="images/autodesk/image14.png" />
    </Frame>
  </Step>

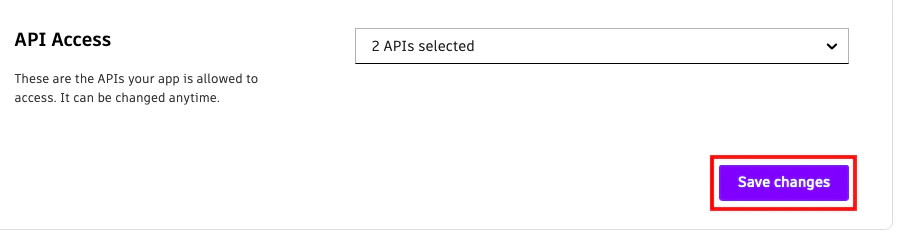
  <Step title="Save Your New App">
    Press the Save changes button to complete the creation of your new app.
    <Frame>
      <img className="rounded-md" style={{ margin: '0 auto', border: '1px solid #efefef' }} alt="Save Your New App" src="https://mintcdn.com/stackone-hub-docs-confluence-api-token-update/r1CxNaPqqmzcLh_k/images/autodesk/image15.png?fit=max&auto=format&n=r1CxNaPqqmzcLh_k&q=85&s=f545c3ce80485a6ad653b65193853fbe" width="907" height="243" data-path="images/autodesk/image15.png" />
    </Frame>
  </Step>
</Steps>

## Enable Your Autodesk App API Access

<Steps>
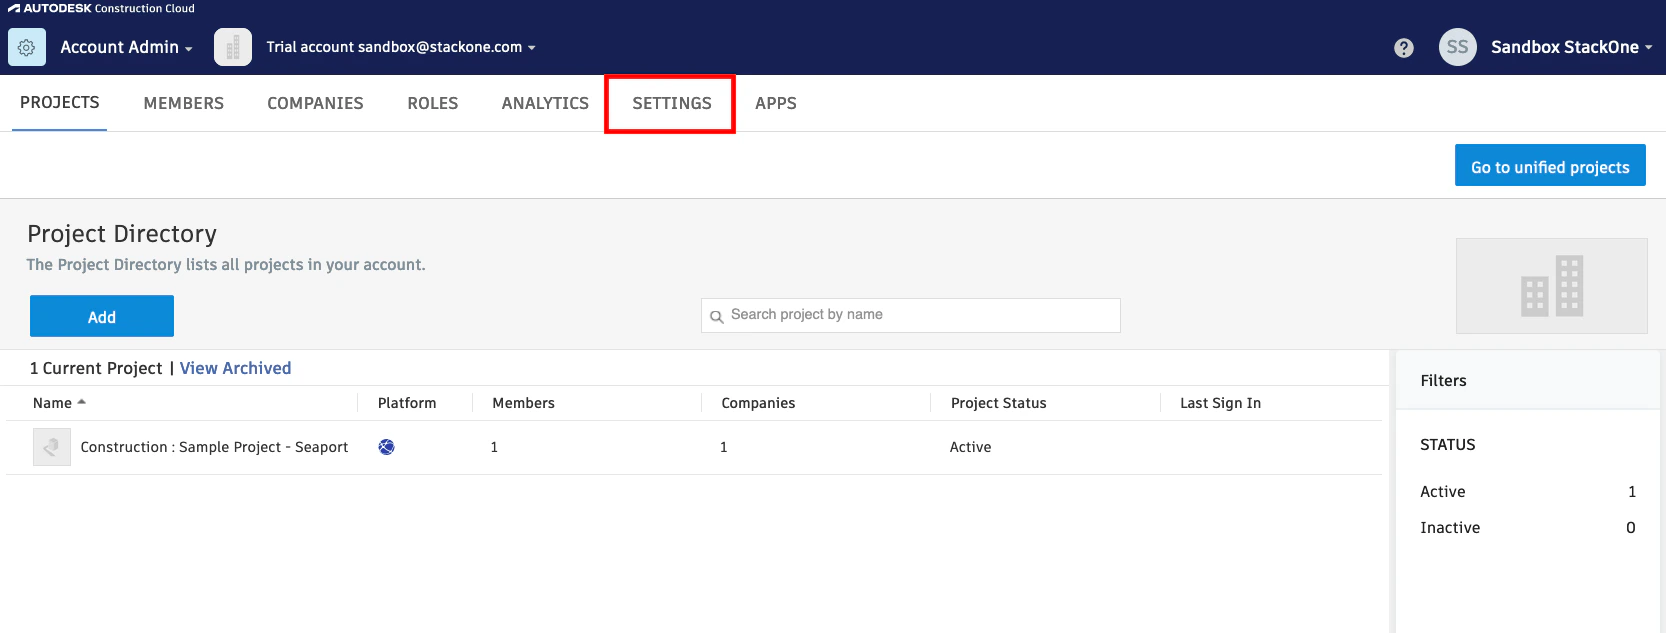
  <Step title="Access Settings">
    In your [B360 Admin](https://admin.b360.autodesk.com), click SETTINGS.
    <Frame>
      <img className="rounded-md" style={{ margin: '0 auto', border: '1px solid #efefef' }} alt="Access Settings" src="https://mintcdn.com/stackone-hub-docs-confluence-api-token-update/r1CxNaPqqmzcLh_k/images/autodesk/image6.png?fit=max&auto=format&n=r1CxNaPqqmzcLh_k&q=85&s=1e446c5cb46ed0ebda8a885f5cb5ba84" width="1666" height="633" data-path="images/autodesk/image6.png" />
    </Frame>
  </Step>

  <Step title="Custom Integrations">
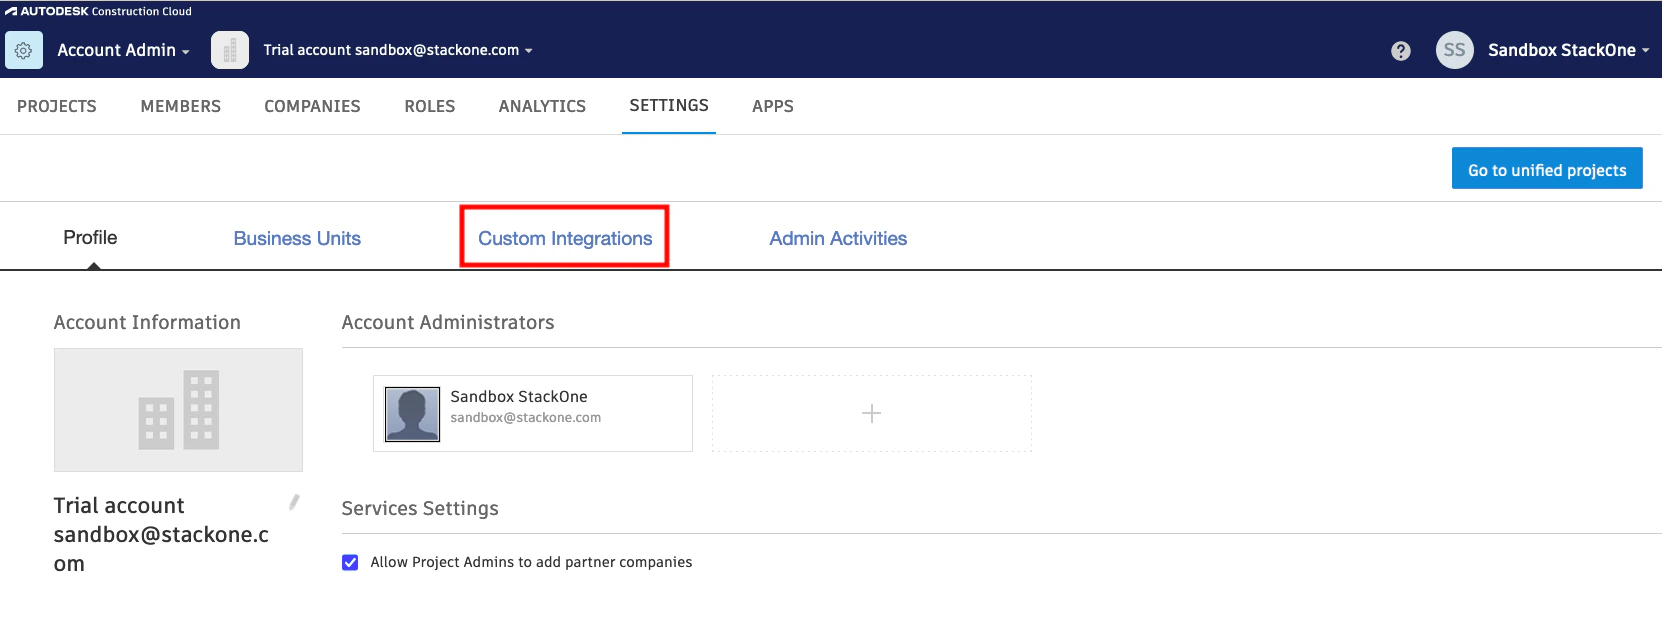
    Click Custom Integrations.

    <Frame>
      <img className="rounded-md" style={{ margin: '0 auto', border: '1px solid #efefef' }} alt="Custom Integrations" src="https://mintcdn.com/stackone-hub-docs-confluence-api-token-update/r1CxNaPqqmzcLh_k/images/autodesk/image7.png?fit=max&auto=format&n=r1CxNaPqqmzcLh_k&q=85&s=667c9ad54dc720485cb6456048362d14" width="1662" height="638" data-path="images/autodesk/image7.png" />
    </Frame>
  </Step>

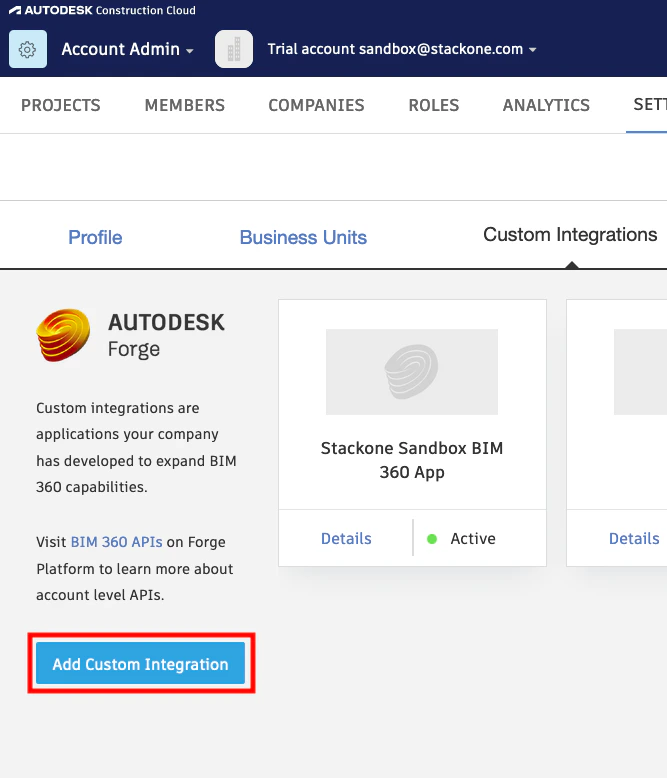
  <Step title="Add Custom Integration">
    Create a new integration for the StackOne connection by clicking the Add Custom Integration button.
    <Frame>
      <img className="rounded-md" style={{ margin: '0 auto', border: '1px solid #efefef' }} alt="Add Custom Integration" src="https://mintcdn.com/stackone-hub-docs-confluence-api-token-update/r1CxNaPqqmzcLh_k/images/autodesk/image8.png?fit=max&auto=format&n=r1CxNaPqqmzcLh_k&q=85&s=918792d56ee0e7415d0690edec5395c2" width="667" height="778" data-path="images/autodesk/image8.png" />
    </Frame>
  </Step>

  <Step title="Select Access">
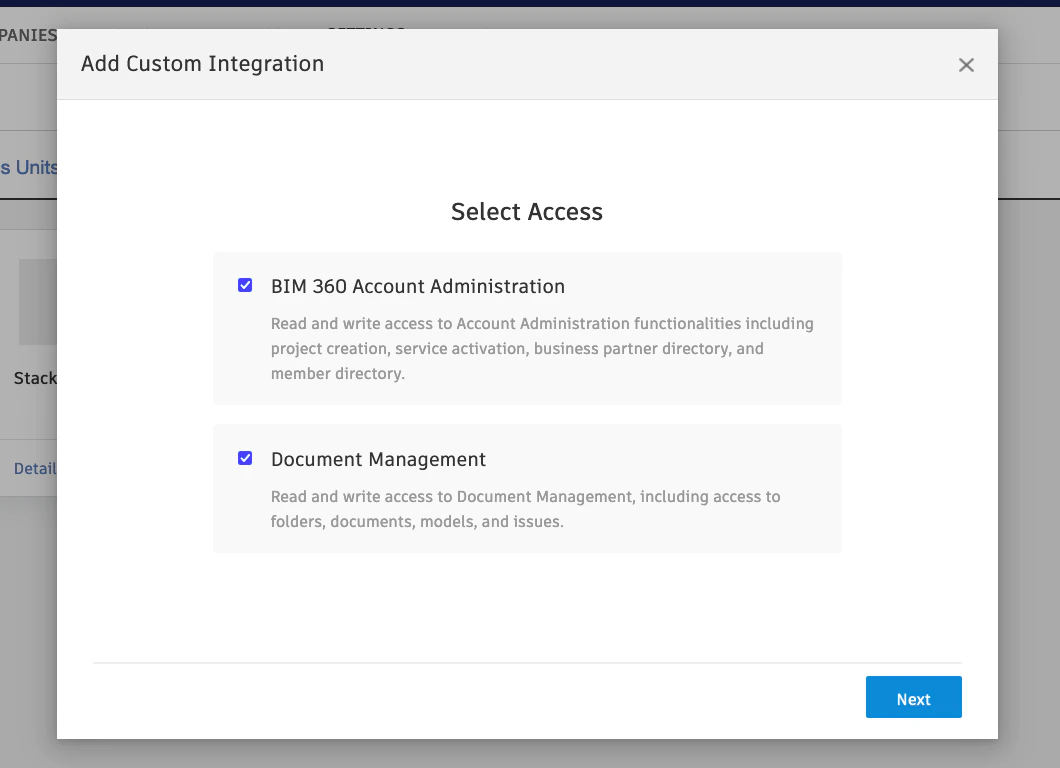
    Under Select Access, enable BIM 360 Account Administration and Document Management, then click the Next button.
    <Frame>
      <img className="rounded-md" style={{ margin: '0 auto', border: '1px solid #efefef' }} alt="Select Access" src="https://mintcdn.com/stackone-hub-docs-confluence-api-token-update/r1CxNaPqqmzcLh_k/images/autodesk/image9.png?fit=max&auto=format&n=r1CxNaPqqmzcLh_k&q=85&s=d8a49b6a431677b25ba4e83b022fd36d" width="1060" height="768" data-path="images/autodesk/image9.png" />
    </Frame>
  </Step>

  <Step title="Developer Selection">
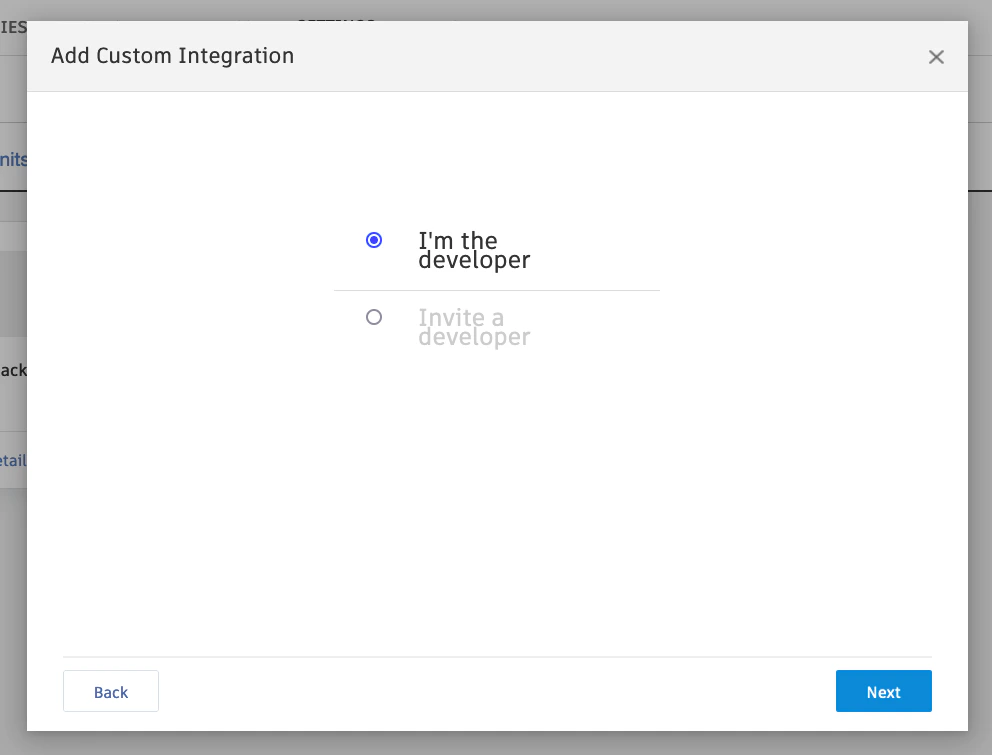
    Select I'm the developer, then click the Next button.
    <Frame>
      <img className="rounded-md" style={{ margin: '0 auto', border: '1px solid #efefef' }} alt="Developer Selection" src="https://mintcdn.com/stackone-hub-docs-confluence-api-token-update/r1CxNaPqqmzcLh_k/images/autodesk/image10.png?fit=max&auto=format&n=r1CxNaPqqmzcLh_k&q=85&s=65bdcea4d7a36c5f73e15ca87b13ce56" width="992" height="755" data-path="images/autodesk/image10.png" />
    </Frame>
  </Step>

  <Step title="BIM 360 Info">
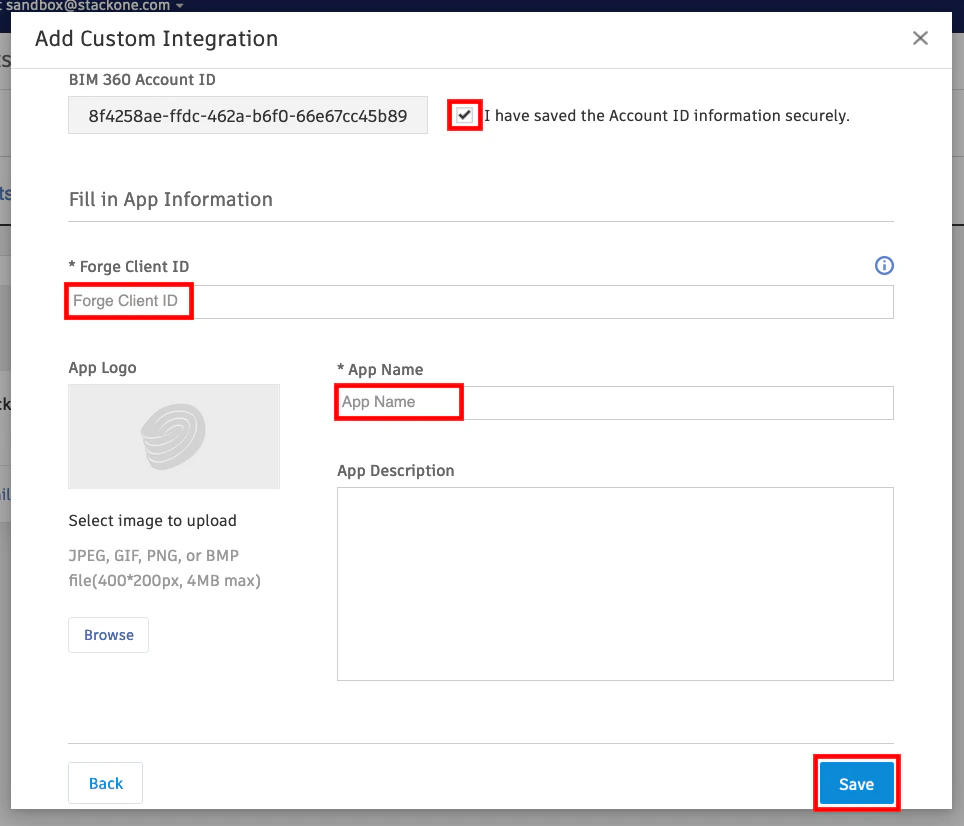
    Under BIM 360 info you need:

    <ul>
      <li>Check the box next to "I have saved the Account ID information securely"</li>
      <li>Enter your App's Client ID from the previous step as the Forge Client ID</li>
      <li>Enter the Name of your App as the App Name</li>
      <li>Click the Save button to complete</li>
    </ul>

    <Frame>
      <img className="rounded-md" style={{ margin: '0 auto', border: '1px solid #efefef' }} alt="BIM 360 Info" src="https://mintcdn.com/stackone-hub-docs-confluence-api-token-update/r1CxNaPqqmzcLh_k/images/autodesk/image11.png?fit=max&auto=format&n=r1CxNaPqqmzcLh_k&q=85&s=9f3638f8d42cb820ac1bea352505d865" width="964" height="826" data-path="images/autodesk/image11.png" />
    </Frame>
  </Step>
</Steps>

## Connecting with StackOne

<Steps>
  <Step title="Enter Credentials">
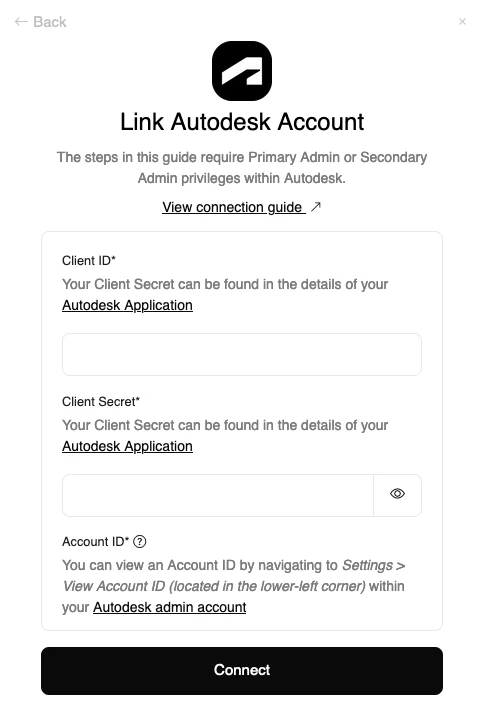
    Upon reaching the Link Account page, enter your credentials from the previous steps:

    <ul>
      <li>Client ID</li>
      <li>Client Secret</li>
      <li>Account ID</li>
    </ul>

    Proceed by clicking the Connect button.
    <Frame>
      <img className="rounded-md" style={{ margin: '0 auto', border: '1px solid #efefef' }} alt="Link Account" src="https://mintcdn.com/stackone-hub-docs-confluence-api-token-update/r1CxNaPqqmzcLh_k/images/autodesk/image12.png?fit=max&auto=format&n=r1CxNaPqqmzcLh_k&q=85&s=41c7470775da0cb339876ddf3ae74718" width="484" height="721" data-path="images/autodesk/image12.png" />
    </Frame>
  </Step>
</Steps>

<br />

Congratulations, you're all set! If you face any issues with the steps mentioned above,
please contact us by emailing [integrations@stackone.com](mailto:integrations@stackone.com). We're always here to assist you!

## Available data

This integration has the following [IAM Resources](https://docs.stackone.com/reference/iam_list_users) available from the provider:

<ul>
  <li>Users</li>
  <li>Roles</li>
  <li>Groups</li>
</ul>

## Useful Links

<Card title="Get Access to a BIM 360 Account" icon="link" href="https://aps.autodesk.com/en/docs/bim360/v1/tutorials/getting-started/get-access-to-account/#step-1-provisioning-a-bim-360-account">
  [https://aps.autodesk.com/en/docs/bim360/v1/tutorials/getting-started/get-access-to-account/#step-1-provisioning-a-bim-360-account](https://aps.autodesk.com/en/docs/bim360/v1/tutorials/getting-started/get-access-to-account/#step-1-provisioning-a-bim-360-account)
</Card>

<Card title="​Manage API Access to BIM 360 Services" icon="link" href="https://aps.autodesk.com/en/docs/bim360/v1/tutorials/getting-started/manage-access-to-docs/#scenario-1-provision-access-for-your-own-app">
  [https://aps.autodesk.com/en/docs/bim360/v1/tutorials/getting-started/manage-access-to-docs/#scenario-1-provision-access-for-your-own-app](https://aps.autodesk.com/en/docs/bim360/v1/tutorials/getting-started/manage-access-to-docs/#scenario-1-provision-access-for-your-own-app)
</Card>